Friday, October 29, 2010

Friends Never Fade

Hi Stampers!
Today’s card was created for two challenges – The Paper Players PP21- Ann’s Choice (see http://www.thepaperplayers.blogspot.com/ ) and  the Pals Paper Arts PPA66 – Margaret Moody’s Sketch Challenge (see http://www.palspaperarts.com/ ) .
The Paper Players Challenge required the use of DP (Designer Paper), a punch and a sentiment.    I wanted to use the 1 ¼” Black Striped Grosgrain Ribbon, so decided to keep the card fairly simple. 
I embossed the focal image with Black EP and of course, had to add those pearls!   Since the stamped image already included sentiment, I modified the sketch and used the bow at the top for #5. 


Stamp Sets:  Friends Never Fade
Cardstock:  Basic Black, Very Vanilla
Ink: Versamark
Accessories: Big Shot, Finial Press EF, Basic Gray DP (retired Hostess Level I), 1 ¼” Black Striped Grosgrain Ribbon, 5/8” Black Satin Ribbon, Scallop Trim Border Punch, Pearls

Thanks again for visiting- I hope all of you have a lovely weekend!

Thursday, October 28, 2010

One Card- Two Challenges!

Hi Stampers!

Today’s card was created for the Stamping 411 Sketch Challenge SSC174 (see http://www.stamping411.blogspot.com/ ) along with this week’s ColourQ Challenge CQC56 (see http://colourq.blogspot.com/ ). 


I will be attending a quarterly demonstrator meeting soon and need to create a swap card- what do you think about this one? 
I used the same masking background technique that I have used on several other cards- so quick and easy! 


Stamp Sets:  Just Believe, Short & Sweet
Cardstock:  Whisper White, Certainly Celery, Garden Green, Rich Razzleberry
Ink: Certainly Celery, Garden Green, Pumpkin Pie, Rich Razzleberry
Accessories: Big Shot, Finial Press EF, Sponge Daubers, 5/8” Rich Razzleberry 5/8” Satin Ribbon, Scallop Trim Border Punch, Victoria Crochet Trim, Rhinestones

Thanks again for visiting- I truly enjoy the friendship that we have through our love of stamping- God Bless!

Wednesday, October 27, 2010

Dasher Christmas

Hi Stampers!  

Today’s card was created for The Create with Connie and Mary CCMC121 Photo Inspiration (see http://www.createwithconnieandmary.com for more details). 

Using the Big Shot and the new Northern Flurry EF (from the Holiday Mini), I embossed a Whisper White layer then stamped the snowflake image from Serene Snowflakes in Marina Mist Classic Ink.  Using a Sponge Dauber with Marina Mist, I lightly sponged over the raised snowflake images and applied Dazzling Diamonds glitter with a 2-Way Glue Pen.

The Dasher image and sentiment were stamped in Cherry Cobbler Classic Ink.  The satin ribbon is from my stash and is a perfect match to Cherry Cobbler. 

 
Stamp Sets:  Dasher, Serene Snowflakes, Christmas Greetings
Cardstock:  Whisper White, Marina Mist, Cherry Cobbler
Ink: Marina Mist, Cherry Cobbler
Accessories: Big Shot, Northern Flurry EF, Sponge Dauber, Dazzling Diamonds, 5/8” Satin Ribbon from my stash, Rhinestones

I hope you like this card- have a blessed week!

Monday, October 25, 2010

PPA65- Bring on the Bling!

Hi Stampers!

Today’s card was created for The Pals Paper Arts Challenge PPA65 Bring on the Bling! (see http://www.palspaperarts.com/ for more details and the lovely samples from the Design Team and submissions). 


To keep the card CAS (Clean and Simple) I chose the use of monotone colors along with a simple stamp design.


Stamp Sets:  Cute by the Inch (Hostess Level II), Teeny Tiny Wishes
Cardstock:  Early Espresso, Soft Suede, Very Vanilla
Ink: Soft Suede
Accessories: Big Shot, Finial Press EF, 5/8” Early Espresso Satin Ribbon, Rhinestones

Thanks for visiting and have a great week! 

Sunday, October 24, 2010

Possbility of a Miracle

Hi Stampers!

I wanted to create a card using Part II of this week’s ColourQ’s CQC55 Challenge Colors- (see http://colourq.blogspot.com/) and the SUO Challenge #4 to use fabric of some type (crochet trim and ribbon qualify as fabric)- see http://suochallenges.com/?p=36


A dear friend of mine ended her battle with breast cancer and went to be with the Lord over a year ago and another friend has just finished chemo, so I wanted to be able to make a card in honor of the two of them. 

Luckily I was able to use a few pieces of previously embossed cardstock and designer paper to speed the process of making this card :-)   

Stamp Sets:  Great Friend, En Francais, Peace Within
Cardstock:  Basic Black, Pink Pirouette, Pretty in Pink DP, Regal Rose
Ink: Basic Black
Accessories: Big Shot, Finial Press and Square Lattice EF, Large Oval, Medium Oval and Scallop Trim Border Punch, Victoria Crochet Trim, 1 ¼” Black Striped Grosgrain Ribbon, Sandpaper Block, Pearls

Thanks again for looking- have a blessed Sunday!    

Friday, October 22, 2010

One Card- Two Challenges!

Hi Stampers!
I created a thank you card today combining this week's The Paper Players Sketch Challenge PP20 (http://www.thepaperplayers.blogspot.com/) with Splitcoast Stamper’s CC290 Color Challenge (see the gallery of submissions at http://www.splitcoaststampers.com/gallery/showgallery.php?cat=all&si=CC293&what=keywords ). 


Using a brayer, I layered Old Olive lightly onto Whisper White.  I stamped the background stamp from French Foliage in Old Olive over the brayered ink, stamped the leaves in the various colors using the Rock-n-Roll Technique and then sponged Concord Crush around the edges.


Layered the focal image onto Cherry Cobbler, embossed a piece of the Concord Crush DP (Hostess Level I) and using the reverse side, I lightly sanded the embossing to bring out the white core.   I also sprayed this layer  and the sentiment with Frost White Shimmer Paint.

Stamp Sets:  Day of Gratitude, French Foliage
Cardstock:  Whisper White, Cherry Cobbler, Concord Crush DP
Ink: Cherry Cobbler, Concord Crush, Old Olive
Accessories: Big Shot, Vintage Wallpaper EF, Sponge Daubers, 5/8” Old Olive Satin Ribbon, Decorative XL Label Punch, Frost White Shimmer Paint,  SU! Markers, Brayer

Thanks again for taking the time to visit- have a blessed day!

Thursday, October 21, 2010

Tutorial- Sponged Background

Hi Stampers! 

Thank you so much for all of your comments regarding my recent posts-  we all love receiving feedback and it is so encouraging to me! 

I have had a few requests to explain how I created the sponged background for this card, so I thought it may be easier to try to type a step by step tutorial (to the right is a close-up view of the actual stamped background).
Since this card utilizes a Masking Technique, you will need to create the masks (do not throw them away when you are finished- they can be used several times).  To create the sky mask, I first punched a 1 ¾” circle from a repositionable note (3x3).  Using the portion that had the “punched out” opening, I determined where I wished for my moon/sun to be located and allowed the sticky part of the note to hold the mask in position on the Whisper White cardstock.  I covered up part of this area at the bottom to allow the moon/sun to be in a rising position.  I then used a Sponge Dauber inked with Pumpkin Pie Classic Ink to color in the sun image (using stroking and circular motions).

I created another mask with scrap Whisper White cardstock, tearing along the edge to create a jagged area for the "grass/hills".  Using the "grass" mask, I placed this at the bottom of my sponged moon cardstock and held it with my left hand as I sponged the Wild Wasabi Classic Ink (again with a Sponge Dauber) over the bottom portion of the cardstock.  At this angle, I was protecting the sky area and previously inked sun/moon area from the green ink. 

I applied a bit of repositionable adhesive to the back of the individual circle cut out and placed this over the Pumpkin Pie moon.  I reversed the mask from the bottom (I had to juggle this a bit to have it work but don’t worry- the tree line will cover most of this area) and covered the recently sponged Wild Wasabi grass area (now to protect the grass).  I sponged the Tempting Turquoise ink over the sky area using straight “swooping” motions.  When inking close to the moon/sun image, I held the circle mask down tightly along the edges to get a clean, crisp edge.

After removing the masks, I sponged the Pumpkin Pie around the outer edge of the moon/sun and finished off any white areas with the Wild Wasabi around the grass area as well.    

Using Elegant Eggplant, I stamped the small background stamp from the new set in  French Foliage (Holiday Mini) over the moon/sun.  I also inked up the Lovely As A Tree images with Elegant Eggplant and stamped the line of trees twice over the Wild Wasabi area and using the larger pine type tree, stamped it over the line of trees.  Using a sponge dauber with Elegant Eggplant, I sponged the edges all around the image. 

Using the Big Shot and the Vintage Wallpaper Embossing Folder (EF), I embossed a piece of Wild Wasabi and sponged Elegant Eggplant over the Wild Wasabi (to show the raised detail of the EF).  I attached the Pumpkin Pie layer over Elegant Eggplant, adhered the embossed Wild Wasabi piece over the Pumpkin Pie and mounted the focal image. 

Using the Color Spritzer Tool with the Elegant Eggplant marker, I “spritzed” the entire card.  Stamped the sentiment below the picture with “Best Wishes” from the Short & Sweet set.

I took a small piece of Pumpkin Pie 5/8” Satin Ribbon and folded in half, lined it up with the corner, punched through with the 1/16” hand held punch and inserted an Antique Brad.  I have posted the finished card again to the left for reference. 

This masking technique works great for scenes of all colors- give it a try yourself and have some fun! 

Thanks again for visiting and blessing my life!

Wednesday, October 20, 2010

CQC55 with SSC173 Sketch Challenge


Hi Again, Stampers!

I wanted to create a card using Part I of this week’s ColourQ’s CQC55 Challenge Colors- (see http://colourq.blogspot.com/) along with the Sketch Challenge from Stamping 411 with the Operators (see http://www.stamping411.blogspot.com/). 


I had not had a chance to ink up my new set, Artistic Etchings yet so decided to use this set along with the fall colors in the challenge.  I utilized a few pieces of previously embossed cardstock along with a collage technique to create this quick and easy card.


Stamp Sets:  Artistic Etchings, French Foliage, Teeny Tiny Wishes
Cardstock:  Basic Black, River Rock, Very Vanilla
Ink: Basic Black, Poppy Parade, River Rock, Tangerine Tango
Accessories: Big Shot, Vintage Wallpaper and Finial Press EF, Distressing Tool, Sponge Dauber, 1 ¼” Black Grosgrain Ribbon, Modern Label and Word Window Punch, Champagne Mist Shimmer Paint, Pearls, Dimensionals

Thanks again for looking- have a blessed week!   

Tuesday, October 19, 2010

CCMC120 Color Challenge- Two Cards, One Challenge!

Hi Stampers!

I created two cards for the Create with Connie and Mary CCMC120 Color Challenge this week (http://www.createwithconnieandmary.com),   

Both cards are quick and easy and utilized a few scraps that I had from previous projects. The first card uses a masking technique with Sponge Daubers to create the scene prior to stamping the tree images. 

Stamp Sets:  Lovely As A Tree, French Foliage, Short & Sweet
Cardstock:  Whisper White, Elegant Eggplant, Pumpkin Pie, Wild Wasabi
Ink: Elegant Eggplant, Pumpkin Pie, Tempting Turquoise, Wild Wasabi
Accessories: Big Shot, Vintage Wallpaper EF, Sponge Daubers, Color Spritzer Tool, SU! Elegant Eggplant Marker, 5/8” Pumpkin Pie Satin Ribbon, Antique Brads


The second card implements SU! Classic Ink Pads with a Blender Pen to watercolor the images.  Cut a few layering circles, add some ribbon and pearls and the card is finished! 

Stamp Sets:  Fast & Fabulous (Hostess Level II), Teeny Tiny Wishes
Cardstock:  Whisper White, Elegant Eggplant
Ink: Elegant Eggplant
Accessories: Big Shot, Square Lattice EF, Blender Pens, 5/8” Pumpkin Pie Satin Ribbon, Pearls, Circle Cutter

Thanks again for taking the time to visit- have a great evening!

Monday, October 18, 2010

Fall Inspiration- Happy Birthday

Hi Stampers!

It has been a very busy week and I was so thankful to have a chance to stamp this evening!  I wanted to create a card for the Pals Paper Arts PPA64 Challenge (see  http://www.palspaperarts.com/) to see the Design Team samples along with all of the wonderful entries.  

I love the colors in this photograph and wanted to make a card using the colors and chose to use the butterfly image from Flores Suaves. 

This card was very quick to create using several embossing folders, masking and a bit of layering. 
Stamp Sets:  Flores Suaves, Teeny Tiny Wishes
Cardstock:  River Rock, Early Espresso, Very Vanilla
Ink: Basic Black, River Rock              
Accessories: Big Shot, Finial Press and Square Lattice EF, SU! Markers- Peach Parfait and Cajun Craze, White Gel Pen, 5/8” Early Espresso Satin Ribbon, Modern Label and Word Window Punch, Pearls, Dimensionals

Thanks for visiting- I hope have a blessed week!

Wednesday, October 13, 2010

CQC54 Two Cards for One Challenge!

Hi Again, Stampers!

I wanted to create a couple of cards using the ColourQ’s CQC54 Challenge Colors- see http://colourq.blogspot.com/ for more details and the lovely samples from the Design Team and entries. 


The first card uses Elements of Style along with the Vintage Wallpaper EF. 

 I embossed the Old Olive layer with the EF and sponged Concord Crush to distress the cardstock. 

I used the main floral image from Elements of Style with Basic Black Classic Ink and watercolored the image using a Blender Pen with Concord Crush, Pumpkin Pie and Old Olive Classic Ink. 

Using the Distressing Tool I distressed the edges, spritzed the card and sponged the edges with Concord Crush.  Layered this onto Concord Crush and sprayed this image along with the embossed background with Frost White Shimmer Paint mixed with 70% alcohol.

Angled the 5/8” Olive Satin Ribbon, added the sentiment and pearls.

Stamp Sets:  Elements of Style, Teeny Tiny Wishes
Cardstock:  Old Olive, Concord Crush, Whisper White
Ink: Basic Black, Concord Crush, Old Olive, Pumpkin Pie    
Accessories: Big Shot, Vintage Wallpaper EF, 5/8” Old Olive Satin Ribbon, Modern Label and Word Window Punch, Color Spritzer Tool, SU! Concord Crush Marker, Blender Pen, Distressing Tool, Sponge Dauber, Frost White Shimmer Paint, Pearls


The second card uses the Masking Technique with Pumpkin Pie, Concord Crush and Old Olive Classic Ink along with Sponge Daubers to create the background scene. 

I stamped the Just Believe floral image with Basic Black, trimmed and added the Concord Crush layer.   Using the Big Shot, I embossed the Pumpkin Pie with the Square Lattice EF, layered this onto Concord Crush, added the 5/8” Black Satin Ribbon, Rhinestones and the sentiment from Peace Within.

Stamp Sets:  Just Believe, Peace Within
Cardstock:  Concord Crush, Pumpkin Pie, Whisper White
Ink: Basic Black, Concord Crush, Old Olive, Pumpkin Pie    
Accessories: Big Shot, Square Lattice EF, 5/8” Basic Black Satin Ribbon, Medium Oval Punch, Sponge Daubers, Rhinestones

 Thanks again for taking the time to visit- I love reading your comments and you are such an encouragement for me!    Have a blessed week!   

PP19 Merry Christmas

Hi Again, Stampers!
I wanted to create another card using The Paper Players PP19- Jaydee’s Color Challenge (see http://www.thepaperplayers.blogspot.com/ ). 


This card was very quick to create using one of the new embossing folders- Northern Flurry.

Stamp Sets:  Lovely As A Tree, Teeny Tiny Wishes
Cardstock:  Basic Black, Real Red, Whisper White
Ink: Basic Black                                
Accessories: Big Shot, Northern Flurry EF, 5/8” Basic Black Satin Ribbon, Modern Label and Word Window Punch, Rhinestones, Dimensionals

Thanks for visiting- I hope you like it! 

Monday, October 11, 2010

PP19 and SSC172- Two Challenges in One!


Hi Again, Stampers!

I needed another sympathy card so I decided to incorporate two challenges– The Paper Players PP19- Jaydee’s Color Challenge (see
http://www.thepaperplayers.blogspot.com/ ) along with the sketch challenge from Stamping411 with the Operators #SSC172 (see http://www.stamping411.blogspot.com/). 

I decided to use one of the new Hostess Level II sets- Fast & Fabulous to create the focal image. 

I stamped the large floral image in Basic Black on Whisper White and used a Blender Pen with  Real Red ink to fill in the flowers. 

Sponge Daubers and the Color Spritzer Tool with Basic Black were used to distress the image.

The Real Red layer was embossed with the new Elegant Lines EF and a few pearls, Frost White Shimmer Paint and 5/8” Basic Black Satin Ribbon finished off the card (the Shimmer Paint did not photograph well). 

Stamp Sets:  Fast & Fabulous, Teeny Tiny Wishes
Cardstock:  Basic Black, Real Red, Whisper White
Ink: Basic Black, Real Red                 
Accessories: Big Shot, Elegant Lines EF, 5/8” Basic Black Satin Ribbon, Modern Label Punch, Frost White Shimmer Paint Mist, Pearls, Sponge Dauber, Color Spritzer Tool, Dimensionals

This is a quick easy card- I hope you like it! 

Sunday, October 10, 2010

French Foliage & Day of Gratitude- Three Challenges in One!

Hi Stampers!     I used three challenges to create today’s card –
The Pals Paper Arts Color Challenge PPA63 (see http://www.palspaperarts.com/),
 the CCMC119 sketch challenge from Create with Connie and Mary
SUO Challenges #3- Holiday Mini (see  http://suochallenges.com/?p=36). 


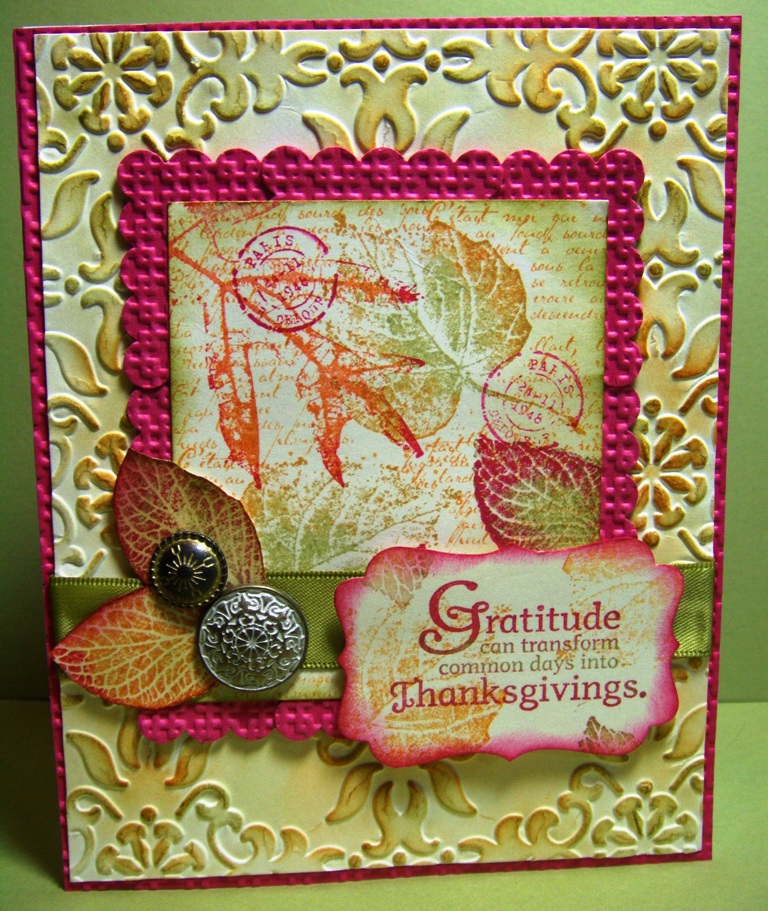
I decided to use my new set from the Holiday Mini- French Foliage and the colors from the PPA63 challenge.  The colors were a bit pastel for a fall card, but I decided to focus on the Melon Mambo as the accent color.

Using Very Vanilla as the base with the Big Shot, I embossed the panel with the Vintage Wallpaper EF and sponged Pear Pizzazz and Peach Parfait to highlight the embossing. 

I also embossed the Melon Mambo layer with the Square Lattice EF and using the Square Scallop Punch, overlapped the individual punched out shapes to create the scallop border around the focal image. 

Using the Rock-n-Rock technique, I first stamped the leaves on the focal image with Pear Pizzazz and rolled in either Peach Parfait or Melon Mambo.  Using the Masking Technique, I covered the leaves and stamped the word background stamp from the French Foliage set using Peach Parfait.  A bit of sponging with Pear Pizzazz finished off the effect.

I did not have any Pear Pizzazz ribbon, so I substituted Old Olive for the ribbon layer and stamped a few of the leaf images (again with the Rock-n-Roll technique) and cut them out for layering and added a few of the new Antique Brads.

The sentiment is from another new stamp set in the Holiday Mini, Day of Gratitude and I first stamped the image in Pear Pizzazz and using a Sponge Dauber, pounched  Melon Mambo on the Gratitude and Thanksgivings area. 

I took the previously inked leaf stamps and "huffed” to re-moisten the ink. I stamped these images over the sentiment to tone down the Very Vanilla and give a distressed appearance.  Punched out the sentiment using the new Decorative XL Label Punch and sponged the edges with Melon Mambo.    

Stamp Sets:  French Foliage, Day of Gratitude
Cardstock:  Melon Mambo, Very Vanilla
Ink: Pear Pizzazz, Peach Parfait, Melon Mambo      
Accessories: Big Shot, Square Lattice and Vintage Wallpaper EF, 5/8” Old Olive Satin Ribbon,Sponge Daubers, Square Scallop and Decorative XL Punches, Antique Brads, Dimensionals

I know the colors in this card are somewhat unconventional but I hope you like it!  Thanks again for visiting- have a great day!

Saturday, October 9, 2010

CQC53 Just Believe

Hi Stampers!

I know it’s late and I should be packing up for my workshop tomorrow morning (11 am and it is now past midnight) but I felt that I wanted to create a few more cards to show the versatility of the Just Believe stamp set using the colors from this week’s ColourQ #53 (see http://colourq.blogspot.com/). 


The first card uses the small floral image from Just Believe stamped in Pacific Point and colored using SU! Markers.

Stamp Sets:  Just Believe, Herb Expressions
Cardstock:  Whisper White, Baja Breeze, Pacific Point, Pear Pizzazz, Pumpkin Pie
Ink: Pacific Point, Baja Breeze          
Accessories: Big Shot, Finial Press EF, Backgrounds I Texturz Plate, Crimper Tool, SU! Markers- Pear Pizzazz, Pumpkin Pie, 5/8” Pumpkin Pie Satin Ribbon, SU! Punches- Fancy Flower XL, 2 ½” Circle XL, 1 3/8” Circle, Scallop Trim; Pearls


The second card is another quick and easy card using the large floral image from Just Believe and SU! Markers along with the Color Spritzer Tool. 

Stamp Sets:  Just Believe, Teeny Tiny Wishes
Cardstock:  Whisper White, Pacific Point, Pear Pizzazz
Ink: Pumpkin Pie                               
Accessories: Big Shot, Finial Press EF, SU! Markers- Baja Breeze, Pacific Point, Pear Pizzazz, Pumpkin Pie, 5/8” Pumpkin Pie Satin Ribbon, The Tearing Edge, SU! Punches- 1 3/8” Circle, Word Window, Modern Label; Pearls


Thanks again for visiting- have a blessed weekend!

Thursday, October 7, 2010

CQC53 Wish Big

Hi Stampers!  

I know I should be preparing for my workshop on Saturday, but I just had to create a card using the colors from this week’s ColourQ #53 - check out http://colourq.blogspot.com/ for lovely samples from the Design Team (as well as all of the other entries).    I decided to use the Stamping411 with the Operators sketch SSC171 again (see http://www.stamping411.blogspot.com/ - such a great sketch!).


This card was quick and easy- I stamped the floral image from Just Believe with Pacific Point and used SU! Markers in Pear Pizzazz and Pumpkin Pie to color in the flowers.  I used a  the Color Spritzer Tool and a SU! Baja Breeze Marker to add a little interest in the background.

After layering the panels, I used a previously embossed piece of Whisper White and mounted this onto the Pacific Point and Pear Pizzazz layer.  I originally had a simple stamped sentiment with three pearls to the left, but I did not like the way that turned out so I decided to layer behind the sentiment with the Decorative XL Punch.

Stamp Sets:  Just Believe, Short & Sweet
Cardstock:  Whisper White, Baja Breeze, Pacific Point, Pear Pizzazz, Pumpkin Pie
Ink: Pacific Point                              
Accessories: Big Shot, Finial Press EF, Color Spritzer Tool, SU! Markers- Baja Breeze, Pear Pizzazz, Pumpkin Pie, 5/8” Pumpkin Pie Satin Ribbon, Decorative Label XL Punch, Pearls

Thanks again for taking the time to visit and I hope you enjoy the rest of your week!

Tuesday, October 5, 2010

CCMC118- Anything But A Card

One More Challenge- Create with Connie and Mary CCMC118- Anything But A Card
(see http://www.createwithconnieandmary.com) If you have a chance, check out their site- the design team created some wonderful examples and all of the submissions are terrific as well! 

I created this note holder that utilizes an inexpensive 5x7 acrylic photo holders- it is so easy to make for gifts.

The background paper started out as Whisper White and using So Saffron , Almost Amethyst and Always Artichoke, the ink was lightly "brayered" on at random.  The mini background stamp from Flores Suaves was used with Elegant Eggplant and sponge daubers were used to ink up the Medallion image.  

Stamp Sets:  Lovely As A Tree, Medallion, Flores Suaves
Cardstock:  Whisper White, Almost Amethyst (retired), Always Artichoke, Elegant Eggplant
Ink: So Saffron, Always Artichoke, Elegant Eggplant      
Accessories: Big Shot, Finial Press EF, Brayer, Sponge Daubers, ¼” Always Artichoke Grosgrain Ribbon (retired)

I hope you enjoy this idea- God Bless!  
Related Posts Plugin for WordPress, Blogger...