Thursday, February 28, 2013

Feb13 Christmas- Card #3- Clean and Simple "Hybrid"


Hi again, Stampers!!

Here is my third design for the February 2013 Splitcoaststampers CCC13 Christmas Card Challenge- I will complete the entire set later this evening but wanted to post before February was officially over but I had a bit of an issue with my computer so I am a few minutes late :-)  

As I mentioned in a previous post, this challenge is basically a commitment to yourself to complete your Christmas cards early (so you can mail them in November).  Last year, I did not have enough cards to mail, so I am re-committing myself in order to be able to start to mail in late November this year and I will need over 200 cards!

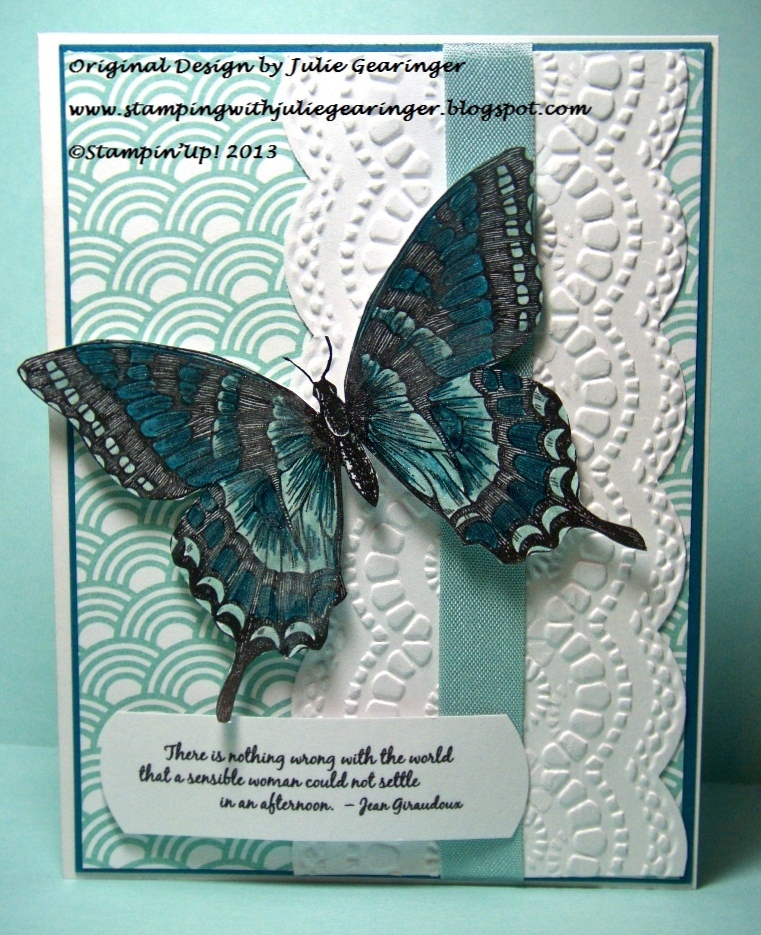
This is another Clean and Simple (CAS) card and although I have the stamp sets, I decided to utilize My Digital Studio (MDS) to print the images and create a “hybrid” card.

To create this card:

Using MDS, insert the stamp brush images and arrange the layout to fit onto one page and print onto a piece of 8.5” x 11” Whisper White cardstock. 

 Use Stampin’ Write Markers in Baja Breeze, Pretty In Pink and Lucky Limeade to color in the image and take an Aqua Painter to soften the colors.

Use the Big Shot™ with the Oval Framelits™ to cut out the images of the little girl and cut another oval the same size out of Basic Gray cardstock to layer behind the image (cut this oval in half to just peek out on the sides).

Close-up of Shimmer Paint
Also with the Big Shot™ and the Holiday Frame Textured Impressions™ Embossing Folder, emboss a piece of Whisper White cardstock for the background.  Use the Aqua Painter with a little bit of Frost White Shimmer Paint to brush over the raised image of the embossing.

Finished set of cards- yea!
Adhere the focal image along with the sentiment (also layered onto Basic Gray and using the 1” Square Punch to create the banner points) and layer the entire panel onto Basic Gray cardstock before mounting onto the Whisper White card base.

Another quick and easy card- I promise I will finish the other five cards :-)

Stamp Sets:  Greeting Card Kids, Come to Bethlehem (both MDS)

Ink: Stampin’ Write Markers- Baja Breeze, Pretty In Pink, Lucky Limeade  

Paper: Whisper White, Basic Gray


Accessories:  Big Shot™,  Holiday Frame Textured Impressions™ Embossing Folder, Oval Framelits™, Aqua Painter, Frost White Shimmer Paint

Thanks again for stopping by- I hope you enjoy the rest of your week!

Feb13 Christmas- CAS with More Old Muse


Hi Stampers!!

Oh no, I am getting a bit behind on my own commitment to create 20-24 Christmas cards a month :-) !!  It is the last day in February and I will get these cards finished, I will get these cards finished :-) !!


To create this Clean and Simple (CAS) card:

Use Stampin’ Write Markers in More Mustard, Old Olive and Midnight Muse to color in the bird image from Gifts of Christmas (one of my favorite retired Christmas stamp sets) and stamp the image onto Whisper White cardstock. Trim and mount onto More Mustard cardstock.

Use the Midnight Muse Stampin' Write Marker to ink the sentiment and stamp onto Whisper White cardstock, trim and mount onto More Mustard cardstock as well.

Here is the entire lot of six :-)
Use the Big Shot™ with the Petals-A-Plenty Textured Impressions™ Embossing Folder to emboss a piece of Whisper White cardstock.  Adhere the focal image and sentiment to the embossed background, add the triple satin bow and mount the entire panel onto More Mustard and then onto the Whisper White card base to finish off the card.

Quick and easy- now off to finish a few more designs for February.

Stamp Sets:  Gifts of Christmas, More Merry Messages

Ink: Stampin’ Write Markers- More Mustard, Old Olive, Midnight Muse  

Paper: Whisper White, More Mustard

Accessories:  Big Shot™,  Petals-A-Plenty Textured Impressions™ Embossing Folder, Gold Satin Ribbon from my stash

Thanks again for visiting- I hope you have a great week and God Bless!

Wednesday, February 27, 2013

Another Quick CAS Card- Two Challenges, MDS and Scraps!


Hi again, Stampers! 

I decided to stay up late and create one more card another  digital image from My Digital Studio (MDS)- Swallowtail.  This image is a background stamp and while I have the actual wood mounted background stamp, it generally will not fit on the standard A2 card, so I was thankful to be able to obtain it in a digital format.  

Why, do you say?  Another thing I love about MDS, is that you can re-size the image plus sets that are retired from the main catalog are still available (as in the sentiment, Favorite Thoughts).

I decided to use this week's Dynamic Duos DD41 colors along with the PP134 sketch from ThePaper Players.  I love both of these challenge sites and again, if you have done so, take a moment to check them out!!

This card was another quick and easy one to create since I already printed the image earlier with my CAS Celebration card (see the last post), had the sentiment printed from months ago and used previously embossed scraps so all I had to do was assemble:-)  

To create this CAS card:

Using My Digital Studio (MDS), position the butterfly image from the stamp brush set,  Swallowtail and reduce to size .  Position the sentiment from Favorite Thoughts on the page below the image and print out onto Whisper White cardstock.

Use the Big Shot™ with the Large Scallop Edgelit™ to cut two pieces of Whisper White cardstock and emboss using the Delicate Designs (Lace) Textured Impressions™ Embossing Folder.  

Adhere these two embossed pieces vertically to the background paper according to the vertical panel in the sketch and mount the entire panel onto a piece of Island Indigo. 

Add the ½” Pool Party Seam Binding Ribbon to cover the seam on the lace embossed panel and adhere the panel to the Whisper White card base.

Color the butterfly image using Pool Party and Island Indigo Stampin’ Write markers.  Use an Aqua Painter™ to apply Shimmer Paint directly to the wings and carefully cut out the image (be careful when cutting- I accidentally cut one of the antennas too short so I had to shorten the other to balance - oops! Now you know all of my secrets:-)).

Close-Up of Shimmer Paint on the wings 
Mount the butterfly and sentiment to the card using Stampin’ Dimensionals (round the corners of the sentiment with the 1 3/8” Circle Punch).

Stamp Sets:  MDS Stamp Brush Set- Swallowtail and Favorite Thoughts

Cardstock: Whisper White, Island Indigo, Sycamore Street DSP

Ink:  Printer Ink, Stampin’ Write Markers- Pool Party and Island Indigo

Accessories:  Big Shot™, Delicate Designs (Lace) Textured Impressions™ Embossing Folder, Large Scallop Edgelit™, 1 3/8” Circle Punch, ½” Pool Party Seam Binding Ribbon, Aqua Painter, Frost White Shimmer Paint, Stampin’ Dimensionals

I hope you like this card- it truly was a quick, easy and fun card to make!  Have fun creating in your craft room this week!

Celebrate- CAS Feeling Sentimental


Hi Stampers! 

I finally had a chance to take a break from work and organizing my craft room to create a Clean and Simple (CAS) card using the PPA153 Pals Paper Arts Sketch and the colors from this week’s CCMC240 Create with Connie and Mary Thursday Challenge.

Again, I hope you will take the time to visit the challenge sites – I cannot say it often enough how great their Design Team samples are, not to mention the dozens of entries submitted each week!

This card was very quick to create!  Instead of pulling out the actual stamp set and ink pads, I decided to use My Digital Studio  (did you notice that the bike is going in the opposite direction?).  I love using the digital program and “mirroring” the image for a different look- plus you can create multiple cards very quickly.

To create this CAS card:

Using My Digital Studio (MDS), position the cycle image from the stamp brush set,  Feeling Sentiment, reduce to size and “mirror” the image.  Copy and change the opacity on the second image to 60% and position to give the impression of motion.  Position the sentiment on the same page below the image and print out onto Whisper White cardstock.

Use the Big Shot™ with the Chevron Textured Impressions™ Embossing Folder to emboss a piece of Whisper White cardstock.  Trim this piece to size for the horizontal panel in the sketch.  Also emboss a piece of Basic Gray using the Fancy Fan Textured Impressions™ Embossing Folder for the background panel.

Layer the horizontal strip onto Melon Mambo cardstock and again onto Daffodil Delight (**Tip**- I use small strips of scraps for this type of layer versus a whole piece of cardstock- saves the cardstock plus reduces the weight of the card for mailing:-)). 

Create the banner for the sentiment using the 1” Square Punch on an angle to create the banner tips.  Layer onto a scrap piece of Melon Mambo and use the punch to mirror the banner tips and repeat with the Daffodil Delight cardstock.

Add the horizontal panel to the Basic Gray embossed background, carefully "fussy cut" around the cycle image and adhere the cycle along with the sentiment banner using Stampin’ Dimensionals.  Attach the ½” Daffodil Delight Seam Binding Triple Bow with Mini Glue Dots to finish off the card.

Stamp Sets:  MDS Stamp Brush Set- Feeling Sentimental

Cardstock: Whisper White, Basic Gray, Daffodil Delight, Melon Mambo

Ink:  Printer Ink

Accessories:  Big Shot™, Herringbone and Fancy Fan Textured Impressions™ Embossing Folder, 1” Square Punch (for banners), ½’ Daffodil Delight Seam Binding Ribbon

Even though this card has a bow with pink and yellow- do you think this would qualify as a masculine card?  Don’t real men love pink :-) ?

Thanks again for stopping by-I plan on working on my February Christmas Card Challenges next :-)-not too many days left in February :-)  Have a great week!

Saturday, February 23, 2013

Two New Challenges in One!


Hi Stampers!!

I hope all of you are having a wonderful week!!  Splitcoaststampers has a new challenge- Mix-Ability Challenge and this week’s MIX4 is “Water Are You Doing?”- the goal is to create a project using water and allowing the color to flow.   I decided to give this technique a try with the bright NAC#34 Nacho Average Challenge colors (another new challenge blog for me :-)).

Again, if you have a chance, check out both sites for loads of inspiration!

To create this card:

Use a spray bottle to spritz water onto the Whisper White cardstock and add a few drops of Marina Mist Classic Ink reinker onto the wet areas.  Spritz the ink with more water, lift the paper a bit to let the ink run and dry with the Heat Tool. 

Ink the floral stamp using Real Red Classic Ink and stamp repeatedly over the background.  Lightly spritz water over the images and again, lift the paper to allow the ink to run, heat with the Heat Tool to dry.

Repeat stamping the flowers again and this time do not spritz with the water.

Use a Stampin’ Write Daffodil Delight Marker to color some of the petals yellow.  Trim the panel to size, mount onto Whisper White and trim close to the edge.  

Stamp the sentiment using Real Red Classic Ink onto Whisper White, punch out with the Small Oval Punch, adhere to the main panel and add the 5/8” Daffodil Delight Satin Ribbon bow.
 
Closeup of watercolor effect 
Mount the entire focal panel onto the Whisper White card base using Stampin’ Dimensionals.  Add the Daffodil Delight butterflies and  Pearls to finish off the card.

Stamp Sets: Blooming with Kindness, Short & Sweet

Ink:  Marina Mist, Real Red, Stampin’ Write Marker- Daffodil Delight

Paper: Whisper White, Designer Series Paper Stack - Daffodil Delight

Accessories:  Water, Elegant Butterfly Punch, Small Oval Punch (retired version), Pearls

Thanks again for stopping by- I hope you like my watercolor attempt- have a great weekend!  

Wednesday, February 20, 2013

Birthday Quilt- Two Challenges in One!


Hi Stampers!!

I hope all of you are having a great week so far!!  I have been trying to organize my craft room (I mean craft "store" :-))  this week and in between, making a few cards for some of my favorite challenge sites.  

I created this card using the Dynamic Duos DD40 Colors along with the Create withConnie and Mary Thursday CCMC239 Sketch.  I know I have said it many times before, but the Design Teams at both of these sites are wonderful-hope you take a moment to visit them.

This card is fairly simple- there is no stamping involved since this is a My Digital Studio (MDS) "hybrid”:

Use the 1 ¼” Square Punch to punch out squares from Whisper White and Basic Black Designer Series Paper (DSP).  Cut all of the squares by hand on the diagonal and adhere in the quilt pattern directly onto the Tempting Turquoise DSP.

Trim the “quilt” to approx. 3 1/4"x 3/14” and emboss using the Big Shot™ with the Lacy Brocade Textured Impressions™ Embossing Folder.  Mount onto a 3 ½” x 3 ½” Basic Black Square. 

Use the Lacy Brocade Textured Impressions™ Embossing Folder to emboss a piece of Tempting Turquoise cardstock for the vertical panel and also the 5 ¼” square Whisper White card base as well as another piece of Whisper White for the center circle and butterflies.   Add the vertical panel along with the quilt focal piece to the card (using Stampin’ Dimensionals for the quilt).  

Punch three butterflies out using the Elegant Butterfly Punch and adhere them to the card using Mini Glue Dots. 

Add the circular floral piece to the center (created with the 1 1/4" and 1" Circle Punch) and add the embossed flower (largest flower from the Boho Blossom Punch).  Add a Large Rhinestone to finish off the center of the flower and the smaller Rhinestones for the bodies of the butterflies. 

Add the sentiment to the lower left corner (I used a sentiment I had on hand from MDS already printed out and ready to go- love my scraps!) to finish off the card.

Stamp Sets: Hugs & Wishes - My Digital Studio

Ink:  None- Printer Ink

Paper: Whisper White, Designer Series Paper- Basic Black and Tempting Turquoise

Accessories:  Big Shot™, Lacy Brocade Textured Impressions™ Embossing Folder, Punches- Boho Blossom, Elegant Butterfly, 1 ¼” Square Punch, 1 ¼” and 1” Circle, Medium Oval Punch (retired); Rhinestones

Thanks again for visiting- I hope you have fun and find time to spend in your craft room this week!  

Tuesday, February 19, 2013

Celebrate with Sale-A-Bration!


Hi Stampers! 

I decided to make another card using the correct Just Add Ink JAI154 Challenge Colors- this time I pulled out So Saffron versus Summer Starfruit.  I combined a few other challenges as well- the Splitcoaststampers SC421 Sketch as well as the You Can Do It YCDI7 Splitcoaststampers Challenge to use Multiple Paper Patterns and the Stampin’Up! Only SUO64 Sale-A-Bration (SAB) Challenge to use something from this year’s SAB catalog. 

Again, I hope you will take the time to visit the challenge sites to check out the great Design Team projects as well as all of other Challenge entries- just love all of the ideas that everyone can create from one challenge!!

To create this card:

Use the Big Shot™ with the Herringbone Textured Impressions™ Embossing Folder to emboss a piece of Whisper White cardstock. 

Ink the Ferris Wheel and sentiment from this year’s SAB set, Feeling Sentimental with Midnight Muse Classic Ink and stamp onto Whisper White cardstock.  Carefully cut around the Ferris Wheel image and adhere using Stampin’ Dimensionals onto the embossed panel.  Create the sentiment banner with the 1” Square Punch and mount both onto Midnight Muse cardstock.

Add the DSP strips per the sketch along with the banners (created with a 1” Square Punch).  Add the stamped panel, adhere the 3/8” Midnight Muse Striped Satin triple ribbon bow, banner sentiment and pearls to finish off the card.

Stamp Sets:  Feeling Sentimental (SAB 2013)

Cardstock: Midnight Muse, Whisper White, Comfort Café DSP, Print Poetry DSP, Soft Subtles Designer Series Pack

Ink:  Midnight Muse

Accessories:  Big Shot™, Herringbone Textured Impressions™ Embossing Folder, 1” Square Punch (for banners), Pearls, 3/8” Midnight Muse Stitched Satin Ribbon

Thanks again for stopping by- I hope all of you are having a wonderful week-God Bless!!

Monday, February 18, 2013

Cross-hatched Poppies- Three Challenges in One!


Hi Stampers!!

Another week has flown by and I have been able to spend time creating again:-).  I love the spring colors for this week’s CQC176 ColourQ Challenge and decided to create a card using Stampin' Write markers only for the color and  The Friday Mashup! FM97 Markers and TextureChallenge as well as a special fold card (easel card) for this week’s YCDI6 YouCan Do It Challenge at Splitcoaststampers.   

Again, all of these sites have fabulous Design Team examples as well as the other artist’s entries – if you have a chance, check them out!!

To create this card:

Use the Embossing Buddy® to de-static a piece of Whisper White cardstock.  Ink the Pleasant Poppies background stamp using Versamark™ ink, apply Early Espresso Stampin’ Emboss® Embossing Powder and heat with the Heat Gun.

Color the floral images using Stampin’ Write markers- Lucky Limeade for the stems, Calypso Coral and Primrose Petals for the flowers (and use Raspberry Ripple to add the darker highlights to the petals).  

I decided to try to hide a “boo-boo” in the background (we all make them, right?) with the brush tip of the Basic Black Stampin’ Write marker and used vertical strokes to fill in the background.  Since it seemed to leave a bit of a streaked appearance, I used the fine tip of the Basic Black marker to "cross-hatch" the area (first diagonal lines from left to right, then from right to left to help fill in and darken the background)- I have posted a close-up of the cross hatching below :-)    This took a bit of time but I was able to salvage my card:-) 

Punch out the desired area using the 2 ½” Circle Punch and also punch out a 2 ½” Circle from Lucky Limeade cardstock.   Mount the Lucky Limeade circle behind the floral image (first cut the circle in half and position so the cut edges do not show) and adhere to a Tea Lace Doily.

Create the Easel Card (see tutorial here) from Whisper White cardstock. 

Close-up of Cross-Hatched background :-)
With the Big Shot™ and the Lacy Brocade Textured Impressions™ Embossing Folder, emboss a piece of Whisper White cardstock and a small piece of Lucky Limeade.  

Mount the embossed Whisper White panel (trimmed to a 4” square) to a 4 ¼” square piece of Lucky Limeade and add the focal image using Mini Glue Dots.  Adhere the Satin Ribbon bow along with the Antique Brad (I trimmed off the “tails” of the brad and used Mini Glue Dots to adhere to the bow) and add the sentiment layer (inked with a Basic Black Stampin’ Write marker).

View of the easel card fold 
Add an additional piece of Lucky Limeade (3 ¾” square) to the back to hide the ends of the ribbon and any punched areas (I always punch out areas on my background pieces to use at a later date and lower the weight of the card for mailing).

Add Sticky Strips to the upper part of the easel and mount the focal panel.  Add the embossed Lucky Limeade cardstock to the lower portion and the sentiment (again inked with markers) mounted onto XL Ovals layered from Calypso Coral cardstock.  I also cut out one of the remaining flowers from the background stamp and added it to the lower layer along with Pearls to finish off the card.

Stamp Sets: Pleasant Poppies (background), Blessings from Heaven, Short & Sweet

Ink:  none- Stampin’ Write markers- Lucky Limeade, Calypso Coral, Primrose Petals, Raspberry Ripple

Paper: Whisper White, Lucky Limeade, Calypso Coral

Accessories:  Big Shot™, Lacy Brocade Textured Impressions™ Embossing Folder, Embossing Buddy®, Early Espresso Stampin’ Emboss® Embossing Powder, Heat Tool, Punches- 2 ½” Circle, XL Oval, Word Window, Tea Lace Doily, Antique Brad, Pearls, Satin Ribbon from my stash

Thanks again for stopping by- I hope you have a wonderful week!

Saturday, February 16, 2013

Happy Birthday Wishes- Three in One (well almost:-))


Hi Stampers! 

This has been a busy week again, but I wanted to take a moment to relax in my craft room and create a card.  I decided to use what I thought were the Just Add Ink JAI154 Colors (accidentally used Summer Starfruit versus So Saffron, I hope this will be OK:-)) along with the FMS73 Freshly Made Sketch and the theme of Birthday from Shop Our Stash Challenge #89 ( a new challenge blog for me).

Again, I hope you will take the time to visit each site and check out their great Design Team projects as well as all of other Challenge entries- so much inspiration- just love our craft!!

To create this card:

Use the Big Shot™ with the retired Finial Press Textured Impressions™ Embossing Folder to emboss a piece of Midnight Muse cardstock.  Using the Adorning Accents Edgelit™ cut the edge of the embossed Midnight Muse and a piece of Whisper White cardstock.  Emboss the edge of the Whisper White with the matching Adorning Accents Textured Impressions™ Embossing Folder. 

Ink the Sunflower background stamp with Midnight Muse Classic Ink and stamp onto Summer Starfruit cardstock.  Carefully cut out the Sunflower image and adhere to a piece of Whisper White cardstock that has been stamped with the En Francais background stamp using Midnight Muse Classic Ink. 

Stamp a piece of Summer Starfruit with the En Francais stamp as well for the bottom portion of the card.

Stamp the Birthday Medallion from the retired set, Happiest Birthday Wishes and punch out with the 1 ¾” Scallop Circle Punch.  Add with SU! Dimensions , add the Summer Starfruit banner (crimped with The Paper Crimper), triple satin stitched bow and pearls to finish off the card.

Stamp Sets:  Sunflower (background), En Francais (background), Happiest Birthday Wishes (retired)

Cardstock: Midnight Muse, Summer Starfruit, Whisper White

Ink:  Midnight Muse

Accessories:  Big Shot™, Adorning Accents and Finial Press (retired) Textured Impressions™ Embossing Folder, Adorning Accents Edgelits™ Die, 1 ¾” Scallop Punch, 1” Square Punch (for banner), Crimper Tool, Pearls, 3/8" Midnight Muse Satin Stitched Ribbon

Thanks again for stopping by- have a great weekend!

Sunday, February 10, 2013

10 Minute CAS Card- Color Challenge plus a Sketch!


Hi again Stampers!            
                                                                                       
I wanted to participate in a few challenges and chose to create a card using this week's CTS#14 CAS(E) this Sketch! and the colors from this week's CCMC238 Create with Connie and Mary Challenge.  This is the first time I have been able to participate at the CAS(E) this Sketch! blog and if you have not visited either one of these sites yet, take a few minutes to check them out!!  Great ideas and so much inspiration!!

Clean and Simple (CAS) cards are a bit more difficult for me- not sure why because they should be simple, right?  They are quick to assemble once I decide on the design, but I always have to restrain myself from "overworking" them with sponging, distressing and embellishments :-)  I truly admire those who are so creative with the CAS style :-)

This card only took ten minutes to create since I was able to incorporate a few scraps that were already embossed- love being able to pull a card together using scraps :-)


To create this card:

Use the Big Shot™ with the Elegant Lines Textured Impressions™ Embossing Folder to emboss a piece of Whisper White cardstock and adhere this to a piece of Island Indigo.

Stamp the sentiment onto Whisper White with Island Indigo Classic Ink and adhere to the embossed Island Indigo strip (using the Fancy Fan Textured Impressions™ Embossing Folder).

Ink the smooth side of the interior the Lacy Brocade Textured Impressions™ Embossing Folder with Calypso Coral Classic Ink and emboss a piece of Calypso Coral cardstock.  Punch out the flower using the Blossom Punch and add the stamped center created from the medium medallion stamp in Lacy & Lovely. 

Add the Lucky Limeade leaves and pearl center to the flower to finish off the card.

Stamp Sets:  Lacy & Lovely, Teeny Tiny Wishes

 Ink: Calypso Coral, Island Indigo

Paper:  Whisper White, Calypso Coral, Island Indigo

Accessories:  Big Shot™, Textured Impressions™ Embossing Folders- Elegant Lines, Fancy Fan, Lacy Brocade; Punches- Bird Builder, 1 ¼” Circle, 1 3/8” Circle, Blossom; Pearl

Thanks again for visiting- have a wonderful week crafting and loving your Valentine!

Saturday, February 9, 2013

Afternoon Daydream Simply Scrappin' Kit- 11 Cards and Still Playing!


Hi Stampers!      
                                                                                                         
I have been playing around with the Simply Scrappin’ Kit (SS Kit), Afternoon Daydream and wanted to share some of the cards that I created with approx. 1/2 of the kit (with the addition of Whisper White cardstock for the bases, Tea Lace Paper Doilies, a few of the SAB buttons and, of course, pearls and rhinestones:-)).

I decided to use the same embossing folder for all of the cards and used only one piece of each of the DSP patterns, 1 ½ sheets of each of the cardstock colors and half of the cardstock sticker sheets.  

I did use quite a few punches ( I believe 13 punches in all- love our punches!), a framelit and a sizzlit and after creating these eleven cards, I still have quite a bit of DSP, cardstock and stickers left over!!

Blossom Punch, Lacy Brocade EF, 1" Circle Punch, Pearl 
A few of the cards I decided not to add a sentiment so you could add one as needed :-)

Delicate Designs (Lace) EF, 1 1/4" & 1 3/8" Square Punch, 1" Circle Punch, Pearls 

1 3/8" Square Punch, Tea Lace Doily, Lacy Brocade EF, Large Tag Punch, Pearls 
1 3/8" Square Punch, Tea Lace Doily, Lacy Brocade EF, Sanding Block, XL Oval Punch, Pearls 
Blossom Punch, Scallop Circle Punch, Delicate Designs (Lace) EF, Rhinestones

Lacy Brocade EF, Blossom Punch, 1" Square Punch, Rhinestones 

Tea Lace Paper Doily, Lacy Brocade EF, 1" Square Punch , Postage Stamp Punch, Sizzlits Large Doilies, Pearls 
Lacy Brocade EF, 1" Square and Postage Stamp Punch, Pearls 

Lacy Brocade EF, Sizzlits Large Doilies, 1" Square Punch, Tea Lace Paper Doily,  Pearls
Lacy Brocade EF, Apothecary Accents Framelit, Word Window and Modern Label Punch, SAB Buttons, Tea Lace Paper Doily, Pearls 

Lacy Brocade EF, Curly Label Punch, 1 3/8" Circle Punch, Word Window and Modern Label Punch, Pearls 


Stamps:  Teeny Tiny Wishes, Blessings from Heaven, Trust God

Paper:  Afternoon Daydream Simply Scrappin' Kit, Whisper White 

Accessories: Big Shot™, Lacy Brocade , Delicate Designs (Lace) Textured Impressions™ Embossing Folder, Sizzlits™ Large Delicate Doilies, Apothecary Accents Framelits™ Die, Tea Lace Paper Doilies, Pearls, Rhinestones 


Punches- Blossom, Curly Label, 1" and 1 3/8" Circle, 1", 1 1/4" and 1 3/8" Square, Large Tag , Scallop Circle , Word Window, Modern Label, Postage Stamp and XL Oval


I had a great time creating these cards- I hope they will help you see the potential of the Simply Scrappin' Kits!  

Thanks again for stopping by- have a wonderful Valentine's Week! 

Related Posts Plugin for WordPress, Blogger...