Wednesday, March 30, 2016

TCC52 I Will Give You Rest


Hi Friends!!


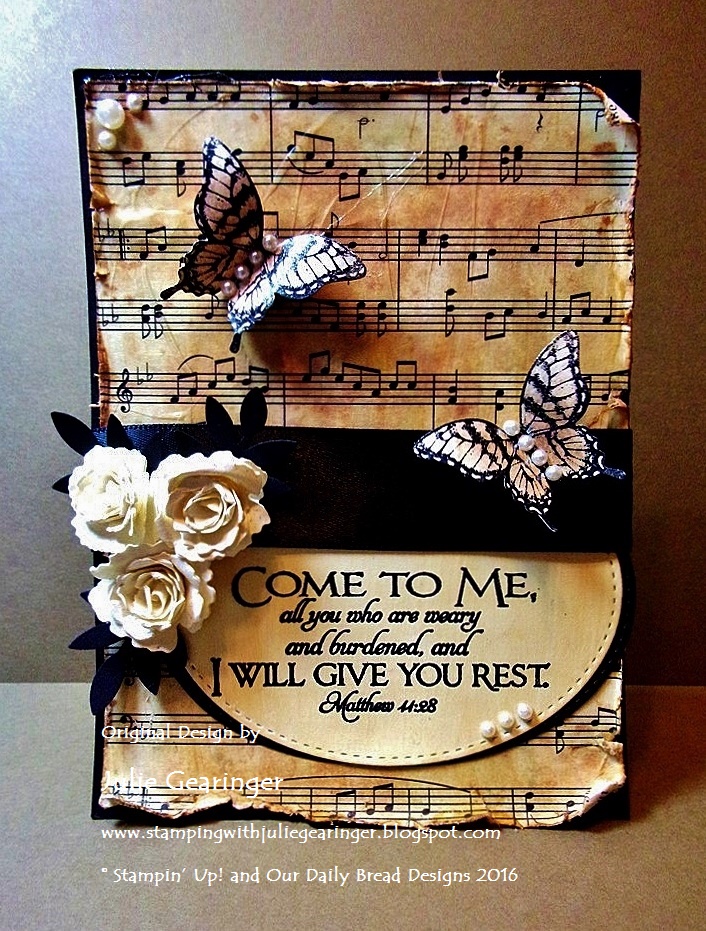
I took inspiration from the gorgeous script and neutral colors along with the flowers and black satin for my Mixed Media card.

Just a reminder that the Card Concept is a bi-weekly challenge that has an inspiration photo along with a number of design styles that you can choose from to create your card- Clean and Simple, Clean and Graphic, Clean and Layered, Shabby Chic, Freestyle Collage, Classy and Elegant and Mixed Media.  


I hope you have a chance to visit us at The Card Concept and check out the rest of our Design Team samples as well as the Alphabet and Splitcoaststampers challenge sites- wonderful inspiration from all!!

To create this card:

Ink the verse from the Scripture Collection 4 from Our Daily Bread Designs (ODBD) using Stāz-On® Jet Black Ink and stamp onto Very Vanilla cardstock.

Use the Big Shot™ with the ODBD Stitched Ovals Dies to cut out the stamped verse and also cut out a piece of Basic Black cardstock.
Split the Basic Black oval in half and adhere behind the die cut verse, apply Tim Holtz® Vintage Distress Medium over the surface and allow to air dry.

 Distress the edges of the Modern Medley Designer Series Paper (DSP) with a Distressing Tool, apply Ranger® Tim Holtz® Old Paper and Tea Dye Distress Stains, heat with the Heat Tool to dry the DSP, apply Tim Holtz® Vintage Distress Collage Medium and once dry apply Tim Holtz® Crazing Distress Medium.

Mount the panel to a piece of Basic Black cardstock, add the Scripture layered die cut to the background panel, adhere a piece of 1” Black Satin Ribbon over the panel (wrapping the edges behind the background panel) and mount the entire panel to the Whisper White card base).

Create the rolled roses with the
It is hard to see the shimmer on the roses and butterflies
but it is there :-)
Big Shot™ with My Favorite Things (MFT) Large Royal  Rose Dies and Royal Rose Dies, roll up the flowers and adhere with Hot Glue in the centers to hold the roses together.

Spritz the flowers with Champagne Mist Shimmer Paint spray, punch out the leaves with the Martha Stewart (MS) Leaf Punch from Basic Black cardstock and add the roses with the leaves to the card front (again, I used Hot Glue).

Stamp the butterflies from Stampin’ Up! Papillon Potpourri using Stāz-On® Jet Black Ink onto Very Vanilla cardstock, color with an AquaPainter™ and Ranger® Tim Holtz® Tea Dye Distress Stain, punch out with the Elegant Butterfly Punch and spritz with Champagne Mist Shimmer Paint spray.

Mount the butterflies onto the card front and add the Pearls to the centers of the butterflies, the corners of the card base and along the sentiment to finish off the card.

Stamp Sets: Papillon Potpourri (Stampin’ Up!), Scripture Collection 4 (ODBD)

Ink: Stāz-On® Jet Black; Ranger® Tim Holtz® Old Paper and Tea Dye Distress Stains, Ranger® Tim Holtz® Vintage and Crazing Medium, Champagne Mist Shimmer Paint Spray

Paper: Very Vanilla, Basic Black, Modern Medley DSP (retired)

Accessories: Big Shot™, MFT Large Royal Rose and Royal Rose Dies, Distressing Tool, AquaPainter™, Elegant Butterfly Punch, MS Leaf Punch, 1” Black Satin Ribbon, Pearls


Thanks again for taking the time to stop by- I hope you can gather your supplies and pick a style to create your own card for our gallery at The Card Concept!  Plus you could have a chance to be in the drawing to win a prize :-) 

SUO 145- Love You, Papa Bear


Hi Friends!   

It’s time for the SUO145 “Cute Critters” Challenge and I decided to combine a the new Bear Hugs stamp set with the coordinating Bear Hugs Framelits™ (both in the 2016 Occasions Mini Catalog) along with Timeless Textures (also in the Mini) and Watercolor Wash (2015-2016 Catalog) to create my Clean and Simple (CAS)  “cute critter” card.


 I hope you will have a chance to check out my sister Design Team member samples at the SU-Only Challenge site as well as the fantastic Design Team samples and gallery at the other galleries- wonderful inspiration from all!

To create this card:

Ink the Bear Hugs images using Stāz-On® Jet Black Ink and stamp onto Whisper White cardstock.

Color the images with an AquaPainter™ and Classic Ink- Soft Suede for the bears, Pacific Point for the skirt and Real Red for the heart.

Cut out the images with the Big Shot™ and the coordinating Bear Hugs Framelits™.

With Marina Mist and Wild Wasabi Classic Ink, ink the Watercolor Wash background stamp (top half with Marina Mist, bottom with Wild Wasabi), use a brayer to lift the ink off of the background stamp and brayer onto a piece of Whisper White cardstock.

Ink the line image from Timeless Textures with Wild Wasabi Classic Ink and stamp over the grass area.

Stamp the sentiment from Bear Hugs with Stāz-On® Jet Black Ink.

Trim the panel and mount with Stampin’ Dimensionals® onto the Whisper White card base.

Adhere the skirt onto the large bear and mount both bear images onto the background with Stampin’ Dimensionals®.

Using a long piece of Natural Linen Thread, double up the length to create a “rope” for the heart image, knot the ends and add the die cut heart to the center.

Bend the arms up on the bears and adhere the heart rope to the large bear image to finish off the card.

Stamp Sets:  Bear Hugs, Watercolor Wash, Timeless Texture

Ink:  Stāz-On® Jet Black, Marina Mist, Real Red, Pacific Point, Wild Wasabi,  Soft Suede
Paper/Cardstock: Whisper White
Accessories: Big Shot™, Bear Hugs Framelits™, AquaPainter™, Natural Linen Thread, Brayer

I think this card could be used for Valentine's Day, Father’s Day or a card for a brand new Dad- what do you think?

Thanks again for stopping by and we hope to see your Stampin’ Up! Only project in our “Cute Critters” Challenge gallery!

Artistic Outpost New Release and Blog Hop!

Hi Friends!  Today is the day for the March release from Artistic Outpost!!   Six fabulous new stamp sets and endless possibilities (please see below for more details) :-)
Grunge Elements, The Golf Club 


To allow you to continue with the Artistic Outpost March New Release blog hop, I will have more details on how to create these cards in future blog posts :-)

Harvest, Seed Packets Background and Grunge Elements
The six new stamps sets are Grunge Elements (a wonderful set that will complement all of the stamps in the Artistic Outpost collection), The Golf Club (fabulous for feminine and masculine cards),  Harvest and Seed Packets Background (wow, these two can be used individually or together for some very unique cards), Bottle Caps Background and Ice Cream Shoppe (another set that complement one another or can be used separately)...

Grunge Elements

The Golf Club


Harvest
Seed Packets Background
Bottle Caps Background 
Ice Cream Shoppe 


There is so much inspiration from my sister Artistic Outpost Designers- please continue to hop along with us and leave a comment at each blog-  you may win a prize:


Prize Information: 
Just for commenting on the Design Team Blog Posts, you have a chance to win a $15 Gift Certificate to the ODBD Website.  You have until April 1, 2016 at 10:00 PM CDT to leave comments on the participating AO DT blogs for a chance to win! One random winner will be selected from the comments left on the designers blogs, the winner will be announced on the AO Blog on April 2, 2016, be sure to check back there to see if you have won! 

Julie Gearinger  (you are here)


Thanks again for stopping by- good luck!  Have a great week and I am looking forward to seeing what you create with the new March release from Artistic Outpost!

Tuesday, March 29, 2016

By The Tide- Thinking of You

Hi Friends!

I hope all of you are having a great week so far!  I decided to create a masculine card using one of my favorite Stampin’ Up! sets, By The Tide along with Gorgeous Grunge and Teeny Tiny Wishes.

I just love the By The Tide stamp set for masculine as well as feminine cards and can always use a few "Thinking of You" cards in my stash :-)

This card was designed using the Paper Craft Crew Challenge #187 Sketch along with the Can You Case It #113 Color Challenge and the Just Us Girls #336 InspirationPhoto for inspiration.

If you have not had a chance to visit the above galleries yet, I hope you will find the time to do so- wonderful designs by all!

All items used to create this card are from Stampin’ Up! with basic stamping techniques- if you have any questions, please feel free to let me know in the comments :-)

Stamp Sets: By The Tide, Gorgeous Grunge, Teeny Tiny Wishes

Ink: Basic Gray, Crumb Cake, Night of Navy, Stāz-On® Jet Black, Champagne Mist Shimmer Paint, White Gel Pen

Paper: Whisper White, Basic Gray, Crumb Cake, retired Crumb Cake and Pocketful of Posies DSP

Accessories: Big Shot™, Oval Framelits™, retired Fancy Fan Textured Impressions™ Embossing Folder, Hexagon Punch, Word Window Punch, Brayer, retired Crumb Cake Button, Natural Linen Thread, Rhinestones


Thanks again for taking the time to visit- hugs and I hope you have a fabulous week!!

Monday, March 28, 2016

You Are Not Forgotten


Hi Friends!

I had a chance to spend some time stamping this evening and decided to create a card using the MFTWSC273 Sketch Challenge along with the MFT #42 Color Challenge and the Splitcoaststampers’ WT576 “Book Pages or Print” Challenge.

If you have not had a chance to visit the above galleries yet, I hope you will find the time to do so- wonderful Design Team samples and inspiration from all!

To create this card:

With the Big Shot™ and the MFT Stitched Rectangle STAX, cut a piece of Whisper White cardstock with the #4 and #6 Stitched Rectangle Dies and cut another piece of Whisper White cardstock with the stitched rectangle die from the MFT Blueprints 20 Dies.

Ink the Forget Me Not from My Favorite Things (MFT) stems using Steel Gray ink and stamp onto the #4 Stitched Rectangle Die cut piece of Whisper White cardstock.

Ink the larger Forget Me Not petal with retired Cameo Coral Classic Ink, stamp onto the Whisper White panel, re-ink the image with retired Poppy Parade Classic Ink (stamping off a bit) and stamp onto the previously stamped petals.

Ink the smaller petal from Forget Me Not with Cameo Coral Classic Ink and add to the panel, ink the center of the stamp with the Poppy Parade Stampin’ Write marker and stamp over the Cameo Coral image.

Create a mask for the floral images, ink the text border image from Forget Me Not (MFT) with Marina Mist Classic Ink and add to the background.

Lightly sponge Marina Mist Classic Ink over the edges and spray the image with Frost White Shimmer Paint Spray.

Use the Faber-Castell® White Pitt Pen Marker to add white highlights to the flower centers.

Mount the floral image panel onto a piece of Marina Mist cardstock, trim and mount onto a piece of Basic Gray cardstock and set aside.
Repeatedly stamp the text border image from Forget Me Not (MFT) with Marina Mist Classic Ink onto the #6 Stitched Rectangle die cut, sponge Marina Mist Classic Ink over the edges and mount onto a piece of Basic Gray cardstock.

Repeat the stamping process as noted above on the Marina Mist Stitched die cut.

Use the Big Shot™ with the Woodgrain Textured Impressions™ Embossing Folder to emboss a piece of Whisper White cardstock, trim and mount onto a piece of Marina Mist cardstock, trim and mount onto the Basic Gray card base.

Add the stamped Marina Mist panel along with the stamped text layered panel.

Cut the banner die from MFT Blueprints 20 from Cameo Coral and Poppy Parade cardstock, split in the center (behind the focal image) to create the lengths needed per the sketch.

Add the banners and mount the focal image with dimensional foam.

Stamp the sentiment from Forget Me Not (MFT) with Steel Grey ink onto Whisper White cardstock and create the flag end with the Hexagon Punch.

Mount the sentiment along with the gray button and Pearls to finish off the card.

Stamp Sets: Forget Me Not (MFT)

Ink: Steel Grey (MFT), Stampin’ Up!- Marina Mist, retired Cameo Coral and Poppy Parade, Frost White Shimmer Paint, Faber-Castell® White Pitt Pen Marker

Paper: Whisper White, Marina Mist, Basic Gray, retired Cameo Coral and Poppy Parade (all Stampin’ Up!)

Accessories: Big Shot™, MFT Stitched Rectangle STAX, MFT Blueprints 20 Dies, Woodgrain Textured Impressions™ Embossing Folder, Hexagon Punch, Sponge Dauber, Pearls, retired Basic Gray button


Thanks again for taking the time to visit- hugs and have a wonderful week!!

Thoughts of You- His Wings


Hi Friends! 

I hope all of you had a wonderful Easter weekend!! 

My husband and I were able to spend Saturday with family and we had a great time celebrating our Risen Savior!!  

Today it is my turn to share a card on the Sweet ‘n Sassy Stamps Blog and I designed this fun Clean and Simple (CAS) card using His Wings, Creative Worship Stamp Set (a division of Sweet‘n Sassy Stamps), along with the Sweet ‘n Sassy Stamps (SNSS) Long StemSilhouettes. 

If you have not had a chance to visit the SNSS blog or the above galleries yet, I hope you will find the time to do so- wonderful inspiration from all!

To create this card:

De-static a piece of Vellum using the Embossing Buddy®, ink the feathers from His Wings (SNSS) using Versamark™ Ink, stamp onto the prepared Vellum, apply Stampin’ Emboss® White Embossing Powder and heat set the images with the Heat Tool.

Once the embossing powder has cooled color the feathers using Stampin’ Write Markers- So Saffron and Soft Sky and fussy cut each of the feathers.

Ink the sentiment from Long Stem Silhouettes (SNSS) using Smoky Slate Classic Ink and stamp onto a piece of Whisper White cardstock, trim the panel and mount onto the Whisper White card base with dimensional foam.

Add the Vellum feathers using narrow strips of dimensional foam (behind the shafts) and finish off the card with a few Rhinestones.


Ink:  Versamark™, Smoky Slate, Stampin’ Write Markers- So Saffron and Soft Sky

Paper: Whisper White, Vellum

Accessories: Embossing Buddy®, Heat Tool, Stampin’ Emboss® White Embossing Powder, Rhinestones

Thanks again for stopping by- I hope you have a fabulous week!

Sunday, March 27, 2016

Christ the Lord is Risen Today- Alleluia!!


Happy Resurrection Sunday, Friends!!

I just love the font and design of the Alleluia Chalkboard stamp from Our Daily Bread Designs (ODBD) and decided to create a quick Clean and Simple (CAS) card for the ODBDSLC272 Scripture and Lace Challenge :-)

I chose patriotic colors for this card to represent the freedom from our sins that we have with our faith in Christ alone for our salvation- 

Eph 2:8-9 “For by grace you have been saved through faith, and that not of yourselves, it is the gift of God, not of works, lest anyone should boast.”

So even though the Alleluia Chalkboard stamp is not technically Scripture, it is based on Scripture and I am so thrilled that I have a personal relationship with the Risen Lord!!  

If you have not had a chance to visit the ODBD site yet, I hope you will find the time to do so...they are celebrating their 8th Anniversary and sharing inspiration from all of their Designers- fabulous inspiration from all!

To create this card:

Ink the Alleluia Chalkboard stamp using Midnight Muse Classic Ink, stamp onto Whisper White cardstock, cut out the image and mount onto Midnight Muse cardstock.

Use the Big Shot™ to die cut and emboss a piece of Whisper White cardstock with the Vintage Flourish Pattern Dies.

Mount the die cut panel onto the Whisper White card base using dimensional foam.

Add the Alleluia Chalkboard image using dimensional foam along with die cut rolled roses and leaves to finish off the card.

Stamp Sets: Alleluia Chalkboard (ODBD)

Ink: Midnight Muse (retired Stampin' Up!)

Paper: Whisper White, Cherry Cobbler, Mossy Meadow, retired Midnight Muse

Accessories: Big Shot™, Vintage Flourish Pattern Dies (ODBD), MS Leaf Punch, Mini Royal Rose and Royal Rose Dies (MFT)


Thanks again for stopping by!!  Hugs and I hope you have a fabulous week, my friends!

Saturday, March 26, 2016

Artistic Outpost- Winter Walk Friendship Never Melts


Hi Friends!

Today I am sharing my project from the Artistic Outpost blog :-)

I realize that spring has arrived and we are celebrating Easter this weekend, but I do like to create Christmas and winter cards all year round and just love the combination of the two Artistic Outpost stamp sets, Winter Walk and Skating Emporium :-)

I am also including this card in the Splitcoaststampers’ Ways to Use It WT567 “Baby It’s Cold Outside”Challenge (to use cool colors) along with the Mixed Media Monthly Card March Challenge #21 "Trees" with opt. birds and the TPD March Tic-Tac-Toe Card Challenge (diagonal- Ribbon, Stamps and Emboss).   


I hope you will take the time to visit the Artistic Outpost Blog as well as the galleries for the challenge sites linked above- fabulous inspiration :-)

To create this card:

Ink the interior of the Tim Holtz® (TH) Poinsettia Knit Textured Impressions™ Embossing Folder with Ranger® TH  Evergreen Bough Distress Stain and emboss a piece of retired Stampin’ Up! (SU!) Baked Brown Sugar cardstock.

Trim the edges, spritz with Champagne Mist Shimmer Paint Spray and use a sewing machine with the zigzag stitch to adhere to a piece of retired Forest Foliage (SU!) cardstock.

With the Our Daily Bread Designs (ODBD) Beautiful Borders Dies, cut a border from Forest Foliage cardstock, adhere to the embossed background and add the strip of light taupe/gold satin ribbon (Offray®- Oatmeal from my stash) along with the strands of pearls.
Mount the entire background panel onto the Baked Brown Sugar (SU!) card base.

De-static a piece of Whisper White (SU!) cardstock with the Embossing Buddy®, ink the Winter Walk stamp set from Artistic Outpost(AO) with Versamark™  ink, stamp onto a prepared cardstock, add the retired Forest Green Stampin’ Emboss® Embossing Powder and heat set with the Heat Tool.

Close up of the texture of the background along
with the pine branches :-)
Once the image has cooled, use a sponge dauber to apply TH Old Paper and Tea Dye Distress Inks over the embossed image, spritz with water to soften the ink and gently wipe with a paper towel.

Trim the panel and mount onto a piece of Forest Foliage cardstock, add dimensional foam to the back and adhere the panel to the card front.

Use the Big Shot™ with the ODBD Lovely Leaves Dies to cut the pine needle branches from Forest Foliage cardstock, mount the branches to the card front and add the triple light gold satin ribbon bow.

Hard to see the gold embossing on the sentiment - looks
better IRL :-)
Even though I like the plain version (I thought I could use it as a note card), I decided to add a sentiment and heat embossed the “Friendship Never Melts Away” sentiment from Skating Emporium using Gold Embossing Powder onto Forest Foliage cardstock.

Once the embossing powder cooled, I cut the sentiment apart and added to the card front to finish off the card (it looks better IRL since it is difficult to read the sentiment in the photo).

Stamp Sets: Winter Walk and Skating Emporium (Artistic Outpost)

Ink: Versamark™,Ranger® Tim Holtz® Evergreen Bough Distress Stains, Old Paper and Tea Dye Distress Inks, Champagne Mist Shimmer Paint Spray

Paper: Whisper White, retired Forest Foliage and Baked Brown Sugar (all Stampin’ Up!)

Accessories: Big Shot™,  ODBD Beautiful Borders Dies, ODBD Lovely Leaves Dies, TH  Knit Poinsettia EF, Embossing Buddy®, Stampin’ Emboss® Forest Green and Gold EP, Heat Tool, Sewing Machine, Pearls, 5/8” Oatmeal Satin Ribbon (Offray®)

Would you be so kind to let me know in the comments, if you were the recipient, which one would prefer to receive- with or without the sentiment?  I read each and every comment and would so appreciate your input!! 


Thanks again for stopping by- hugs and have a wonderful Easter weekend!
Related Posts Plugin for WordPress, Blogger...