Sunday, July 31, 2016

Christmas in July- Wishing You Peace & Joy


Hi Friends!  I had a great time designing a few cards this weekend and decided to share another Christmas card with you today (I way am behind on my personal commitment of trying to create at least 5-6 per month).

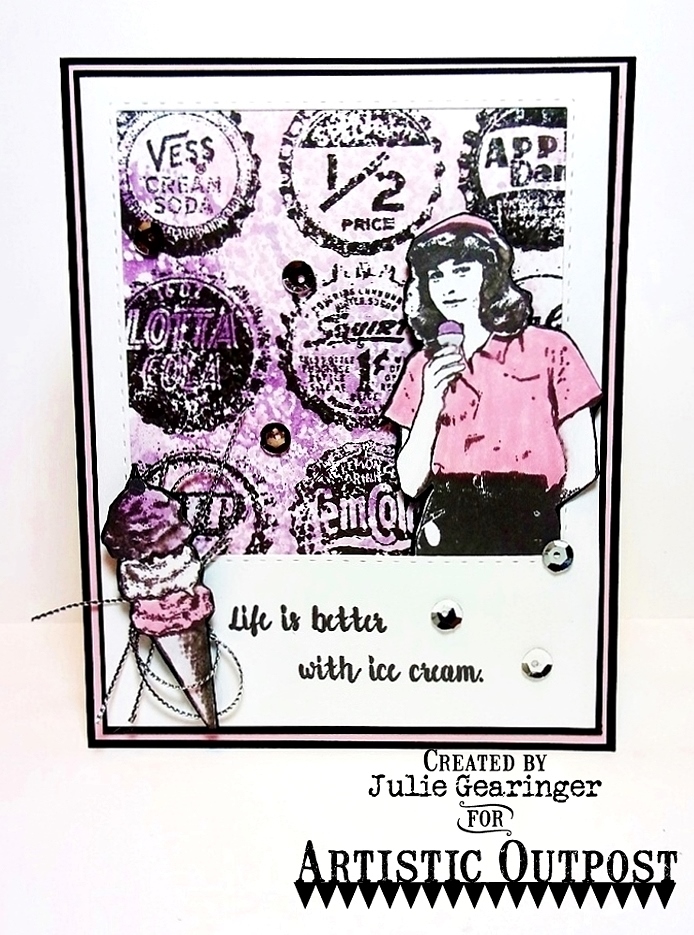
My husband and I love to watch birds and the tufted titmouse is one of our favorites that frequently comes to our feeders, so I pulled out Sweet ‘n Sassy Stamps, Peace of God Clear Stamp Set  along with Season of Love Clear Stamp Set for this Clean and Simple (CAS) Mixed  Media card.


To create this card:

Ink the titmouse image from Peace of God and the sentiment from Season of Love with black archival ink and stamp onto white cardstock.

Use a water brush with distress inks to color the tufted titmouse image and layer both the bird image and sentiment onto gray cardstock.

Add the white highlights with a Sharpie® White Extra Fine Paint Pen.
Emboss a piece of white cardstock with a snowflake embossing folder, apply frost  white  shimmer paint over the panel, trim and mount onto gray cardstock, trim and mount onto the bright pink card base.

Add the layered titmouse image and the sentiment to the card front using dimensional foam to finish off the card (looping the silver cord behind the sentiment before mounting).


Thanks again for visiting- I hope you have a wonderful week, my friends!

Saturday, July 30, 2016

A Sneak Peek....Birthdays are Feathers in the Wings of Time


Hi Friends!

I hope all of you are having a great weekend so far!  Today I am sharing a card designed using the brand new stamp set, Woodpecker to be released on August 1 at Our Daily Bread Designs.

My husband Dave and I love to watch birds and the Red-Bellied Woodpecker is a frequent visitor to our suet and peanut feeders!  

They are a shy bird and extremely fun to watch, so I was thrilled to see this new Woodpecker stamp set in the Our Daily Bread Designs August 2016 Release :-)

I am incorporating the Splitcoaststampers’ SC601 Sketch Challenge into the design along with the Watercooler Wednesday Challenge #78 Jean's “B” Theme (Birthday, Button, Bow, Bird, Branch, Border).

 If you have not had a chance to check out the above challenge sites or the Our Daily Bread Designs Blog yet, I would encourage you to visit soon- fabulous examples from all!!


To create this card:

Using the Our Daily Bread Designs (ODBD) Flourished Star Pattern Die, cut and emboss a piece of white cardstock as well as a piece of the ODBD Americana Quilt 6x6Paper Collection, cut the pieces in half (a bit larger than half for the Americana Quilt piece), mount the white die cut piece onto the top portion of a piece of brick red cardstock, add the Americana Quilt piece to the lower half, trim the brick red cardstock panel and mount onto a piece of denim blue cardstock before adhering this entire card front onto the white card base.

Ink the ODBD Woodpecker image with Stāz-On® Jet Black Ink, stamp onto white cardstock, color with alcohol markers,  "fussy-cut" and use a water brush to add a bit of frost white shimmer paint to the wings and tail area (hard to see the shimmer in the photo).  

This card uses quite a few dies for the layers:

1).  Die cut and emboss a piece of white cardstock with the largest die in the ODBD Layered Lacey Square Dies

2). Die cut and emboss various pieces of the ODBD Americana Quilt 6x6 Paper Collection with ODBD Pierced Squares Dies (one larger than the other)

3), Die cut and emboss a piece of white cardstock with the ODBD Matting Circle Dies, stamp the sentiment from Woodpecker onto the die cut using Stāz-On® Jet Black Ink

4). Die cut and emboss a cut a  piece of denim blue cardstock with the ODBD Double Stitched Circle Dies

Layer both of the die cut Americana Quilt 6x6 Paper Collection pieces onto denim blue cardstock, trimming the edges close.

Cut the die cut Layered Lacy Square Die piece approximately in half (layer behind the larger pierced Americana Quilt Die cut piece to determine where to cut).

Mount this layered panel onto the card front, add the smaller die cut and layered pierced square along with the stamped and layered circle sentiment.

Add the silver metallic thread bow with the red button and mount the Woodpecker image with dimensional foam to finish off the card.

I hope I have inspired you with this new ODBD Woodpecker stamp set and check out the Our Daily Bread Designs website on August 1, 2016 for the entire new release!

Thanks again for taking the time to visit- I hope all of you have a blessed weekend!

In addition to the ODBD Woodpecker (sneak peek) stamp set, I used the following items:

Friday, July 29, 2016

ODBD July 2016 Release- Sending Hugs


Hi Friends!

I have been stamping away this week and will be able to post some of those creations with you later this week and next, but in the meantime, I wanted to share with you another card using the July 2016 ODBD Release Stamps, Sweet As Perfume and You Bless Me.

I just love the artwork of these gorgeous flowers and since I am allergic to the fragrance of flowers, I can have fun creating these flowers without worrying about an asthma attack- lol!!


To create this card:

Layer a piece of ODBD Chalkboard 6x6 Collection paper onto white cardstock, trim and mount onto the black card front.

Die cut and emboss the Vintage Borders Dies from white cardstock, adhere the large frame directly onto the card front and add the smaller border frame with dimensional foam.

Ink the sentiment from You Bless Me with embossing ink, apply gold embossing powder, heat set with a heat tool and die cut/emboss with the Layered Lacey Ovals Dies.

Add the sentiment to the card front along with the black triple satin ribbon bow (wrapping the ends around the card front and trimming the one end that will be covered by the flowers).

Ink the floral images from Sweet As Perfume and You Bless Me with an embossing ink, apply gold embossing powder and heat set with a heat tool.

Once the embossing has cooled, “fussy-cut” each of the embossed images and layer onto the card front with dimensional foam.

Mount the entire card front onto the white card base and add pearls to the flower centers as well as the corners to finish off the card.


Thanks again for stopping by to visit- hugs and I hope all of you have a wonderful weekend!


Thursday, July 28, 2016

Live, Laugh, Play


Hi Friends! 

I hope you are having a great week so far!  Today I am sharing a fun Mixed Media card using The Golf Club and Grunge Elements from the Artistic Outpost Spring 2016 Release by Our Daily Bread Designs.


If you have not had a chance to visit the above challenge galleries or the Artistic Outpost blog yet, I encourage you to do so- wonderful inspiration from all!

To create this card:

Ink the collage advertising stamp from The Golf Club with dark brown ink, repeatedly stamp onto a piece of kraft cardstock to create the background layer, trim and mount onto a piece of black cardstock.

Color the same stamp as above with light blue, bright blue and green water-based markers, stamp onto cream cardstock, add the Grunge Elements border stamp with brown ink, trim and mount onto black cardstock.

Use the flag image along with the smaller advertising image from The Golf Shop and the Grunge Elements border image, stamp onto light blue textured cardstock and lightly spritz with water, trim and mount onto black cardstock.

Layer the stamped pieces per the Mojo Monday sketch (I added a piece of 1” Black Satin Ribbon to cover the seam where I split the background piece) and mount the entire layered card front onto a white card base.

Stamp the golfers with embossing ink onto vanilla cardstock, heat emboss with black embossing powder and once cooled, fussy-cut the images.

Add the male golfer directly to the card front and add the female golfer with dimensional foam.

Create the chevrons with the ODBD Double Stitched Square Dies by cutting a piece of black cardstock with two of the square dies stacked together to create the frame and cut the frame in half to create the "chevron" (it is hard to see the stitching detail in the photo but it is there), add the "chevron" layers to the card front on the side and at the top with the two layered banners.

Ink the sentiment from The Golf Club with embossing ink onto black cardstock, heat emboss with white embossing powder, cut the words apart and mount onto the card front with dimensional foam to finish off the card. 

I think these images in The Golf Club stamp set from the Artistic Outpost are perfect for any golfer in your life, don’t you?

Thanks again for stopping by and I hope you have a fabulous weekend!


Saturday, July 23, 2016

Life is Better with Ice Cream

Hi Friends!! 

I hope all of you are having a great start to the weekend so far!!  

Today it is my turn to highlight a card on the Artistic Outpost blog and I created another quick Mixed Media card using Bottle CapsBackground along with Ice Cream Shoppe from the 2016 Spring Release at ArtisticOutpost.

I decided to incorporate the Splitcoaststampers CAS384 “Cool Treats” Challenge along with the TLC595 “Stamp Selfie” Challenge and the #TGIF65 "Cut It Out" Challenge.

No, this girl image is not me so it is not a true "selfie" (well maybe I looked a little like that 30 years ago-lol!) but I could imagine standing next to a mural in an ice cream shop enjoying a bit of ice cream, how about you?

If you have not already visited the Artistic Outpost blog or the Splitcoaststampers challenge sites yet, I hope you will do so- fabulous inspiration from all!

To create this card:

Stamp the images from Ice Cream Shoppe with gray ink, color with a light pink and plum marker, fussy-cut and mount onto black cardstock, fussy cut once more and apply a thin layer of clear glitter to the ice cream in the large cone. 

Use the modified version of the Smakin’ Acetate Technique to create the backdrop for the Bottle Caps Background- scribble light pink and plum markers onto an opened acetate envelope, lightly spritz with water, close the envelope to "smoosh" the ink around, re-open the envelope and press a piece of white cardstock into the ink.

Stamp the Bottle Caps Background stamp with gray ink onto the splattered background, trim and mount behind a die cut window from white cardstock (using the ODBD Double Stitched Square Dies) along with the girl image popped up with dimensional foam.

Mount onto several layers of light pink and black cardstock before mounting onto the white card base.

Stamp the sentiment from Ice Cream Shoppe with gray ink, adhere the looped silver cord with the ice cream cone along with a few sequins to finish off the card.


Thanks again for stopping by- your visits and comments are such an encouragement to me!  Hugs and have a great week, my friends!


Christmas In July- One Layer Old Fashioned Christmas

Hi Friends! 

I hope all of you are having a great week so far!  We are still celebrating Christmas in July with Sweet ‘n Sassy Stamps blog hop and sale so I decided to try a One Layer Mixed Media card (in contrast to the vintage style card I posted yesterday) using the same stamp set,  Old-Fashioned Christmas.

I am linking this card to the One Layer Simplicity #OLS29 Christmas In July Challenge as well as the Splitcoaststampers  F4A355 “Christmas In July” Challenge.

 I love the versatility of the wonderful image and sentiments in the Old-Fashioned Christmas stamp set and by omitting the horse and carriage for this card, I was able to achieve a completely different look-don’t you agree?  

I also have been inspired by Heather Telford and Michele “Mimi” Jourdain over the years and tried a few of their techniques for this card.

To create this card:

Score and fold a piece of 4 ¼” x 11” white cardstock in half, create a mask from scrap or sticky note paper for the snow bank on the horizon and sponged Tim Holtz® (TH) Picked Raspberry and Chipped Sapphire Distress Ink onto the “sky” area.

Remove the mask and re-positioned to sponge a bit of TH Chipped Sapphire Distress Ink for the foreground snow banks (using a water brush to blend the color).

Ink the trees only from the Old-Fashioned Christmas clear stamp set with TH Peeled Paint Distress Ink, stamp onto the sponged panel, re-ink the same trees again using TH Forest Moss Distress Ink and re-stamp over the first image (I used my MISTI® Tool for this step).

Use a water brush to blend some of the ink on the trees, add shadows with TH Stormy Sky Distress Ink along with a Speedball® Elegant Writer® Black Pen.

Using a Faber-Castell® Pitt Pen White Marker, add a few snowflakes over the background and add additional snowflakes with a fine paint brush and Titanium White Acrylic Paint.

Use an Embossing Buddy® to de-static the sentiment area, ink the sentiment from Old-Fashioned Christmas with Versamark™ Ink  and stamp onto the prepared surface. 

Apply Pewter Embossing Powder to the sentiment and heat set with the Heat Tool to finish off the card.

Stamp Sets:  Old-Fashioned Christmas (Sweet ‘n Sassy Stamps)

Ink: Versamark™, TH Distress Inks- Picked Raspberry, Chipped Sapphire, Stormy Sky, Peeled Paint, Forest Moss; Faber-Castell® White Pitt Pen Marker, Speedball® Elegant Writer® Black Pen

Paper/Cardstock: Extra Heavy Whisper White

Accessories/Tools: Sponge Applicators, Sticky Note Paper, AquaPainter™, Fine Tip Paintbrush, Embossing Buddy®, Pewter Embossing Powder, Heat Tool, MISTI®

I hope I have inspired you to start your Christmas cards and again, if you have not had a chance to join us yet, checkout our “Christmas In July” blog hop and sale!


Thanks again for stopping by- hugs and have a blessed week, my friends!


Friday, July 22, 2016

ODBD July 2016 New Release Reminder

Hi Friends!

I hope all of you are having a great week so far!  Today I am sharing a card that I designed using the Our Daily Bread Designs July 2016 Release stamp set, A True Friend along with the new Ornate Ovals Dies, Layered Lacey Ovals Dies and the previously released Vintage Flourish Pattern Dies.
I just love this iris image along with all of the sentiments in this stamp set, don’t you?

I decided to create a Mixed Media card using the iris and sentiment images from ATrue Friend and will be linking to Word Art Wednesday #240/#241 “Anything Goes”Challenge.

To create this card:

Using the Vintage Flourish Pattern Die, emboss a piece of white cardstock, trim and mount onto a piece of purple cardstock, trim and mount onto a piece of green cardstock.

Cut a piece of whtie cardstock with the ODBD Ornate Oval Dies, add to the card front with dimensional foam, adhere the green satin ribbon (wrapping the edges behind the card front) before mounting the entire panel onto the white card base.

Using archival black ink, stamp the sentiment from A True Friend onto a piece of white cardstock, die cut with the ODBD Layered Lacy Ovals Dies and mount to the card front with dimensional foam.

Stamp the iris image from A True Friend with embossing ink onto a piece of white cardstock, emboss with white embossing powder and once the image has cooled, color with water-based markers.

Fussy-cut the iris image and mount onto the card front with dimensional foam as well.

Add the green satin triple ribbon bow with the purple button in the center to finish off the card.


Thanks again for taking the time to stop by- hugs and I hope all of you have a blessed week!


Related Posts Plugin for WordPress, Blogger...